Automate DL001 chinese hunting camera
I recently installed a cheap infrared hunting camera, one of the many clones of the DL001 hunting cameras you can find on AliExpress.
It can be powered via 4 or 8 AA batteries or a 6V-2A DC charger, it features an OFF/TEST/ON switch, a tiny screen and a series of beeping buttons that allow you to setup the camera.
I quickly discovered that the DL001 does not connect to wifi nor bluetooth; the only way to inspect if any animal passed by the trail is to go to the camera, open it, turn it off, extract the TF (microSD) card from the slot, open the microSD card on a computer, scan through a myriad of false alarms and hours of uninteresting videos, delete all the useless JPG and AVI crap, put the microSD card back in the camera, turn the camera back on.
Another, relatively less annoying way to inspect the contents of the microSD card is to connect to the camera via a micro USB cable; this triggers a storage mode that stops capture and turns the camera in a very bulky USB key.
If you have a wifi signal reachable from where you install the camera, and a nearby DC power outlet, you can automate this process and turn your
Shopping list
- 1x DL001 trail camera
- 1x 6V 2.1A DC universal charger with 3.5mm adapter
- 2x micro USB data cables
- 1x OTG USB A -> micro USB adapter cable
- 3x jumper wires
- 1x 1 channel WeMos D1 5V Mini Relay Shield
- USB charger
- 1x Raspberry Pi Zero W v1.1 or similar GNU/Linux computer
- 2x microSD cards
Setup
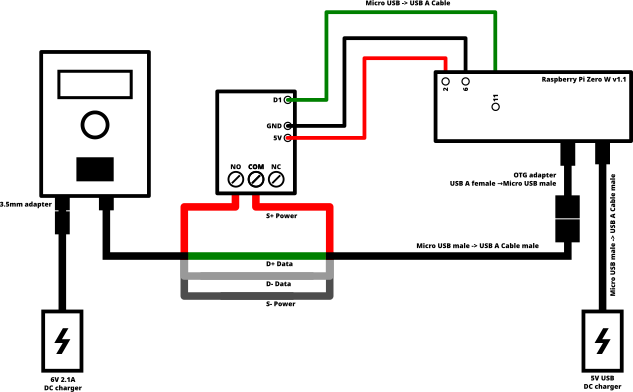
We’ll connect all the parts listed above so that we reach this setup:
Steps
- Format the 2 miniSD cards, one goes into the camera.
- On the other miniSD card install your preferred GNU/Linux distribution, i use DietPi which is sometimes a bit annoying to setup at times but works really well and does not waste your limited resources
- Turn on your Raspberry Pi Zero using the micro USB cable (into the PWR micro USB slot) and the USB wall charger
- Connect it to the wifi network you will use for this trailcam
- Turn it off
- Using the jumper wires connect the pins 2 (5V), 6 (ground), 11 (GPIO17) to the weimos relay pins 5V, GND, D1
- Turn on the pi
- Login and give
pinctrl set 17 op dh, you shoud hear the relay click; turn it off withpinctrl set 17 op dland it should click again - Carefully shave about 2cm of the external layer of the other micro USB data cable using a knife, remove the outside soft plastic casing until you reach the protective foil
- Carefully unwind the protective foil until you can extract the 5v red wire inside
- Split the red wire and peel the red casing on both sides, exposing about 0.5cm of internal wire
- Unscrew the COM (central) and the NO (normally open) screws of the WeMos D1 5V Mini Relay Shield
- Insert the camera side red wire in the NO screw and the raspberry side on the COM screw, i don’t think order matters though
- Connect the OTG converter to the micro USB
USBport of your Pi - Connect the microUSB cable you attached to the relay to the OTG converter cable and to the camera
- Connect camera to charger with the 3.5mm adapter
- Turn camera ON it should power up and go to black screen (recording)
- On the Pi give
pinctrl set 17 op dhand the camera should go instorage mode(black screen, white “storage” text) - If you give
lsblk -tyou should now see asda1partition - Mount it and you should see the files of your camera microSD
- Unmount
- Turn off the cable with
pinctrl set 17 op dl
You now can make your own script to automate this with a cron job so that it gets the files and then rsync them somewhere safe
Extra
If you want you can stream the live camera feed with ustreamer
/usr/bin/ustreamer -d /dev/video0 -m MJPEG -r 1280x960 -f 3 -s 0.0.0.0 -p 8080 -l
If you connect to http://your_pi:8080/stream you will see the live feed, works great on VNC too!